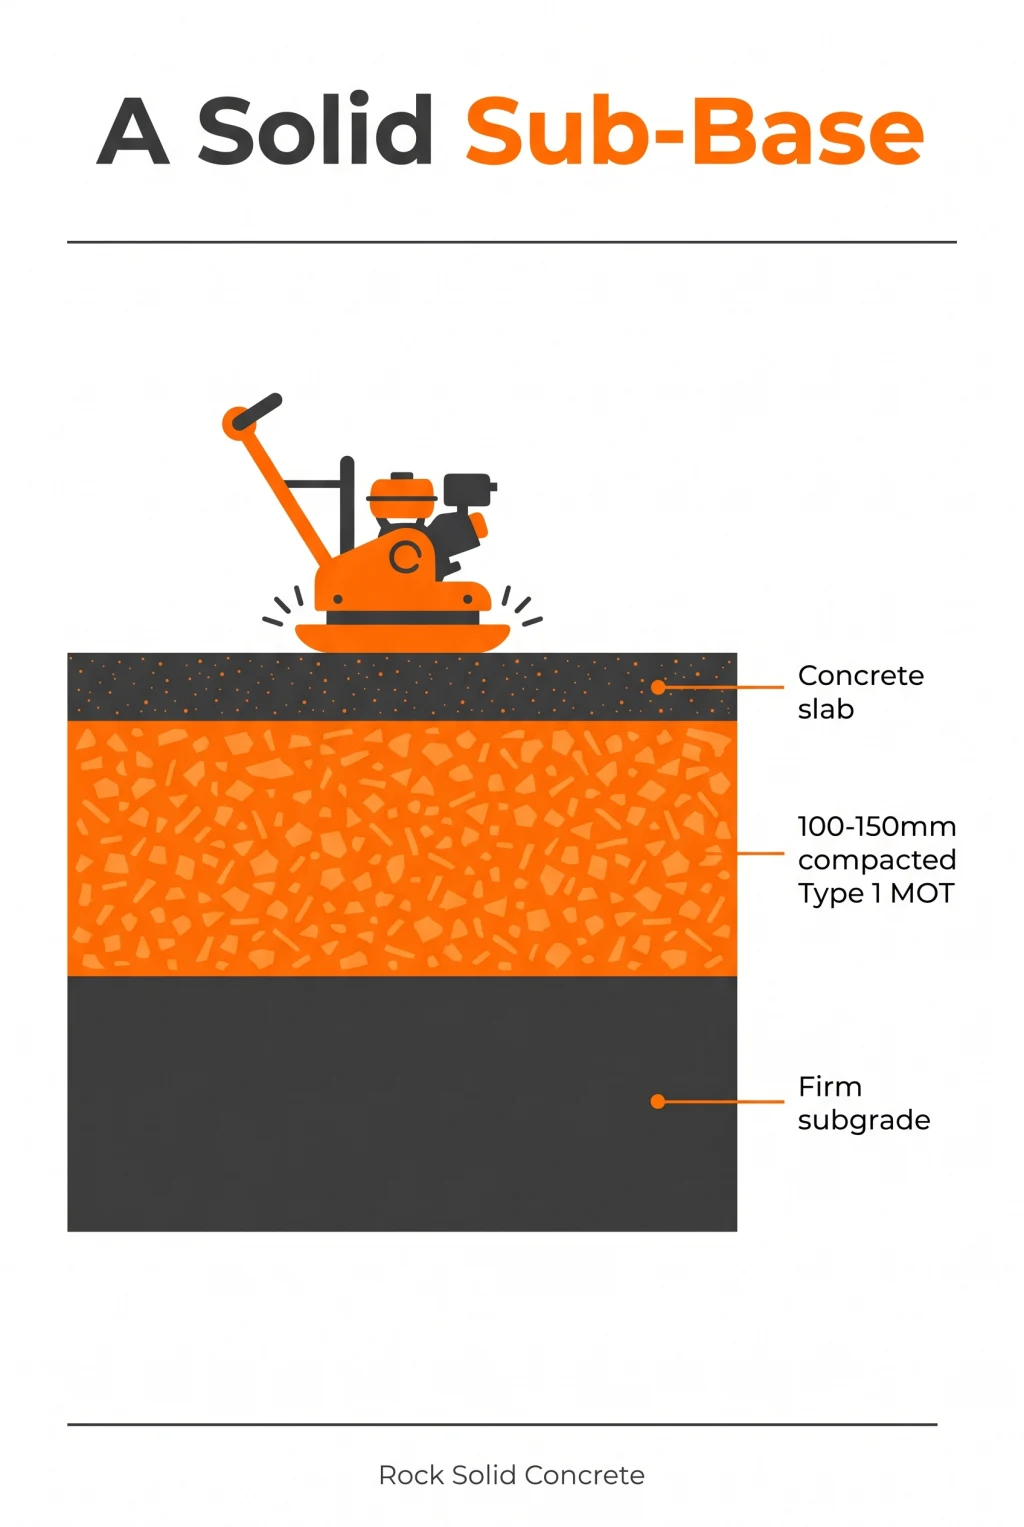
Sub-Base Preparation
A good sub-base turns a hand-poured domestic slab into a 30-year driveway. A bad sub-base turns a structurally perfect C28/35 slab into a cracked mess within two winters. Concrete distributes load, but only if the layer below it holds firm.
Quick answer
A sub-base is the compacted layer of crushed stone, usually Type 1 MOT, laid under a concrete slab. For domestic slabs and driveways, lay 100 to 150mm and compact it in layers. The sub-base spreads load and prevents sinking, and it matters more than the slab itself.
What a Sub-Base Actually Does
Under your concrete slab, the sub-base does four jobs:
- Spreads the load from the slab over a wider area of subsoil
- Drains water away from the underside of the concrete
- Prevents frost heave in cold winters by allowing water to drain below the frost line
- Creates a stable, uniform bedding so the slab doesn't settle unevenly
Skip it, or do it badly, and the slab transmits point loads straight into soft soil, which cracks the slab as the soil moves under seasonal wet/dry and freeze/thaw cycles.
Type 1 MOT: The UK Standard
In the UK, "Type 1 MOT" (Ministry of Transport Type 1) is the standard sub-base aggregate. It's a graded crushed stone, usually limestone or granite, with particle sizes ranging from dust up to 40mm.
Why it works: the mix of fine and coarse particles means it locks together when compacted, leaving very little air space. It becomes a stable, semi-rigid layer that still allows water to drain through.
Alternative, Type 3
Less fines, more drainage. Used on permeable paving or where a SuDS-compliant surface is needed. More expensive per tonne.
Alternative, Crusher Run
Budget alternative. Can be fine for light-traffic domestic but doesn't match Type 1 for load-bearing. Avoid for driveways.
Avoid, Pea Gravel
Round particles roll over each other. Will not compact into a stable base. Don't use for structural applications.
Avoid, Builders' Rubble
Inconsistent sizes, may contain organic matter that breaks down. Short-term fix only; not a real sub-base.
How Deep Should the Sub-Base Be?
Depth depends on the load the slab will carry and the subsoil beneath:
On clay or organic soils, go one step deeper on the sub-base. Clay moves through the seasons, and extra Type 1 helps absorb the movement before it cracks the slab.
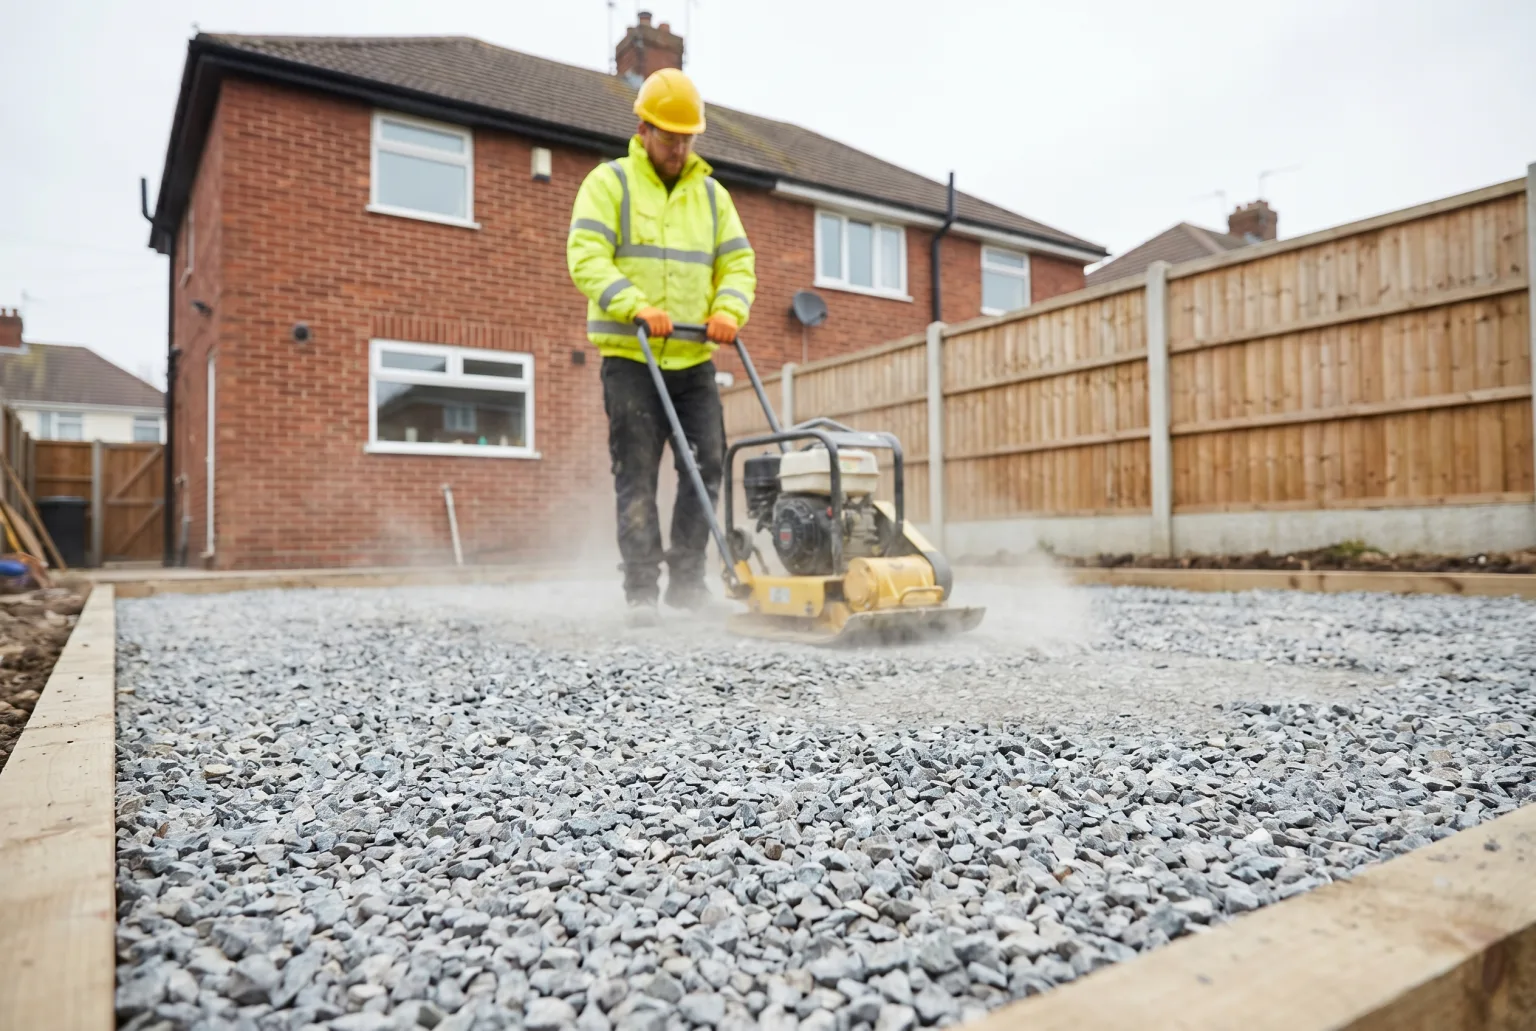
Compaction: Where Most DIY Jobs Fail
Laying Type 1 is easy. Compacting it properly is where it goes right or wrong.
The golden rule: lifts of 50mm
Lay the Type 1 in 50mm layers and compact each layer before adding the next. A 150mm sub-base is three lifts, not one. If you dump 150mm in one go and try to compact it, the bottom 100mm stays loose, and that's where the slab fails.
The right tool
- Wacker plate (vibrating plate compactor), the correct tool for 90% of domestic sub-bases. Hire for £30-£50/day. Don't skip this.
- Pedestrian roller, overkill for shed bases, ideal for driveways over 40m².
- Tamp by foot / stamping with boots, not adequate. Will not achieve proper compaction under load.
What "fully compacted" feels like
You know the sub-base is properly compacted when:
- The whacker plate bounces slightly off the surface rather than sinking in
- Your boots leave no visible print when you walk over it
- A straightedge laid across it shows no dips larger than ~5mm
- You can't push a screwdriver more than a couple of mm into the surface
Common Mistakes
1. Not digging deep enough
The dig needs to accommodate the full sub-base PLUS the slab. For a 100mm slab on a 150mm sub-base, you need to dig 250mm below your finished level. Topsoil must come out completely, never leave organic matter under the sub-base.
2. Leaving soft spots
If you hit a patch of soft, wet, or organic soil during the dig, remove it and fill with extra Type 1, even if that means going 300mm+ deep in one corner. A slab is only as strong as its weakest support point.
3. Skipping the geotextile on soft ground
On very soft subsoil, a geotextile membrane between the subsoil and the Type 1 stops the sub-base slowly sinking into the ground over years. Adds ~£1/m² and adds decades of life on problem ground.
4. Compacting a wet sub-base
Compacting Type 1 when it's saturated just creates mud. Let it drain first. Conversely, bone-dry Type 1 doesn't bind well, a light mist of water helps compaction.
5. No falls / no drainage
A sub-base that holds water breaks down faster. Build a slight fall (1:80 or so) into the sub-base, the slab's fall can follow.
Quick Self-Check Before You Pour
Before the concrete arrives, confirm:
- Sub-base is the correct depth for your application
- Laid in 50mm lifts, each compacted with a wacker plate
- Surface is level to within 5mm with a straightedge
- No soft spots, puddles, or areas that move underfoot
- Correct fall for drainage built in
- DPM laid over the sub-base before the pour
Sub-Base Preparation FAQs
What is a concrete sub-base?
A sub-base is the compacted layer of crushed stone, usually Type 1 MOT, laid under a concrete slab. It spreads load, helps drainage, and gives the slab firm, even support so it does not sink or crack.
How thick should a sub-base be under concrete?
For domestic slabs and driveways, 100 to 150mm of compacted Type 1 MOT is typical. Soft or clay ground needs more, sometimes with a geotextile membrane. Compact in layers for the best result.
Do I need a sub-base for a concrete slab?
Almost always. Pouring concrete straight onto soft or uneven ground leads to settlement and cracking. A compacted sub-base is the single biggest factor in how long a slab lasts.
What material is best for a sub-base?
Type 1 MOT crushed stone is the standard. It compacts to a dense, well-graded layer that drains and carries load. Avoid soft or organic fill, which settles over time.
Sub-base ready? Get an instant price.
Tell us your volume and we'll deliver the concrete to land right as you finish the last prep check. Next-day across the Midlands.